If You're in the Market for great junk...You've come to the right Place!

Showing posts with label make-overs. Show all posts

Wednesday, July 11, 2012

Why I am not an Antique dealer......

THIS is the reason I call myself a junk dealer and NOT and antique dealer! Any reputable antique dealer will know the style of this...couch, sofa, davenport, settee...in a jiffy. ME...not so much.
I am calling it a vintage sofa.
So there!
(Seriously...if you know......please tell me so I can at least pretend to have a little clout in this biz~ and I need an accurate description for the price tag!)

Let me set the stage...I found this in Goodwill.
It's like 20 feet long
(at least 6 cuz my feet don't touch the other end when I lay down)
It's in PRIMO fabulous condition , covered  in a brown ultra-swade (the way I would spell it)  OR ultra -suede( if
you already have clout)
It has a GAZILLION tacks (that look amazing)
And was a PERFECT candidate for a simple make-over that would TRANSFORM and update it in a heartbeat!


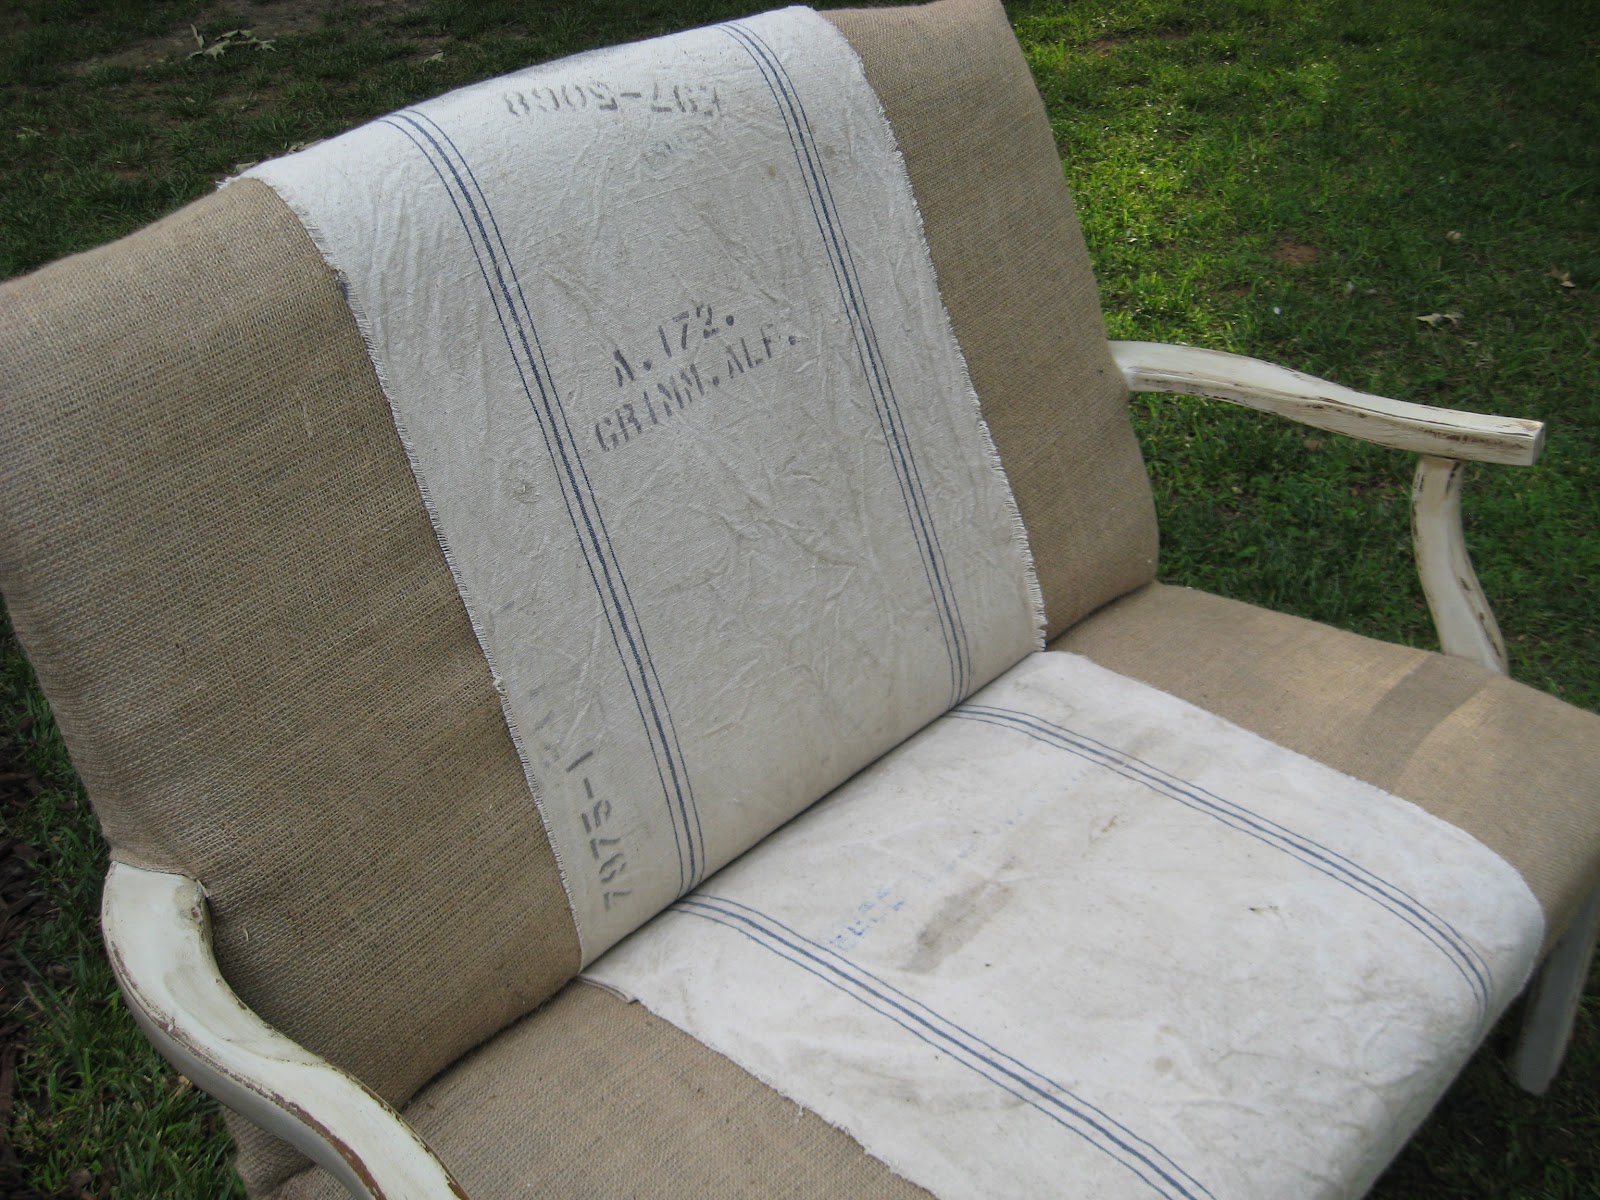
Here it is during the make-over. Let me just say that poor planning not being patient left me with only a LINER brush to use to cut in around all the tacks. It took FOREVER in 200 degree heat in the shade  to do it  but why would you think I would bother to get in the car and drive to the hardware store to grab a different brush!
I had a project to complete people...I need to see results!!!!
I am my own worst enemy...I swear!
(How bout that hillbilly bucket "prop shelf"? Nice huh?? TOP SECRET TRICK OF THE TRADE!)

Looking at this photo you would never guess it's 200 degrees outside with the cute little sun dapples and fluttering leaves.....ugh......

And here we are with the after!

We already took it up to the High Point showroom yesterday and I think she looks great
with the brick walls and wood floors!

The distressed finish took it from blah...to BAM!

I am really happy with the results on this one. I would love to find more pieces like this that just need a quick update.
One thing I know for sure...I WILL be running to the hardware store in the near future to get some different brushes!
Have a great day!
P.S. remember....if you know what style this is...pleeeeze let me know!
THX!!

Sunday, May 13, 2012

Love Seat Project Revealed!!!!!

I. Love. It!!!
I thought I had some idea  had no idea what so ever  on how to do this.
I sweet talked Mr. OTM into helping me out.
THANK GOODNESS!
This really was a two man job simply because one needed to pull while the other stapled.
Other than that~ it went pretty easy!

Sometimes projects tend to take on a life of their own.
They almost speak to you to tell you what to do.

In this case mine said "Hey Beth~ I think that old grain sack you've been hoarding for the "perfect" project
would look great on me! "
She was sooooo soooo right!

While I was delving into my stack of favorites , I dug out this burlap coffee sack and re-did the top of this coffee table!
Huh....coffee sack on a coffee table!
That one REALLY spoke to me.
Wonder if anyone will get it?

Anyway, I love how they look together! Maybe the lucky buyer will think the same thing.
I hate to break um up.
They look so cute and make a great couple. 

This was not a difficult project either.
Paint
Sand
Distress
Cut bag
Glue bag
Take photo

Remember BEFORE????

Here's DURING.......

And finally AFTER !!!!

I didn't plan on this being the star of the show but that's what it turned out to be.
This will be making it's way to the Lucketts Spring Market next weekend!
I am so excited.
Sure hope I can run with the big dogs there!
So much talent in one place.
It's going to be great!

Monday, April 30, 2012

This Just in....I tried chalkboard paint!

Here's a nifty little idea that I came up with last week after being
slapped with  grasiously given  a thousand old chairs!
(seriously it was more like 33 but they are in STACKS!...geez!)

I FINALLY got my hands on a can of chalkboard paint.
I know ....I know.....where have I been right??
Anyway, I grabbed a piece of cardboard and made a stencil.
Freehanded...nothing perfect.
Mostly because I'm impatient and want to see the finished project already.
Anybody else like that?
And here ya go!
You could also do this on the back of the chair as well!
Took like 5 minutes a chair.
LOOOOOVE quick!
LOOOOOVE easy!
After I did this (and what you don't see here) is
I took and old feather pillow and cut it in half.
(YES....there were feathers......everywhere.)
I wanted to create a chair seat for each chair I did so I figured this would be easy too.
It really was except for the feathers  and the fact that my sewing machine is inside the shop and wellllll
let's just day that the feathers were an issue.
You can imagine.
Who knows what's going to get chalkboard paint on it next! This stuff is a blast!
I realize I'm probably  the very last person in blogland  to try this stuff....
But I am hooked and if you haven't tried it yet either....You better get goin!
You'll Love it!
Have a great day.
This post was invited to be a part of Thrifty Tuesday on Coastal Charm!
Please visit to see other wonderful project as well!

Thursday, March 29, 2012

Vintage Canister Set Make-over

And so the "project pile" is getting a bit smaller!


(Only I added another thing to it yesterday)


It's a vicious cycle~ I'm tellin ya!


Here we have your basic vintage aluminum canister set.


A 5 piece to boot!


These were one of those items that I saw at a recent auction ONLY when they were brought up to the front. I totally overlooked them when I previewed everything.


This is a PERFECT example of my brain screaming


"buy them...buy them....we can for SURE do SOMETHING with them!"


So I did.


Thankfully , I was inspired right away with a simple project .I have enough scraps to circle the world over like 4 times.


I love digging into my scrap basket because it makes me feel like I am actually making a huge dent and cleaning it out and well....I still could circle the world like 3 and 3/4 times.


Anyway...start with a scrap of muslin or here in my case I had some great scraps from old grain sacks so I used those.


You will also need some burlap scraps.


If you do NOT have any scraps at all...go buy a yard of muslin and a yard of burlap and after you get done with these labels, you'll have a bunch of scraps left over for your next project!


Just think...I helped you start you scrap basket!


Awww.....and trust me , it will grow and grow.....just like lemon balm in your garden! HA!


okay.....next you'll need a rubber stamp set and stamp pad.
Go ahead and stamp the words of your choice~ keeping in mind.....
THEY DO NOT NEED TO BE PERFECT!
Seriously, you will drive yourself nuts.
Have a few extra pieces to be able to start over on but don't obsess.
Takes the fun totally out.
I then sewed the pieces together.
Simple. Easy. Straight stitch.


After you are done with the labels adhere them to the canisters with a strong glue like E5000.
(Yes I know it's stinky but the odor does go away.)


And there you have it!


Updated vintage canisters worth millions!


You could easily do this with a set of vintage wood canisters as well! Perhaps give them a coat of paint and then apply the labels! For those of you who would just like to be able to buy these labels , I have them listed in my etsy shop (along with the canister set too!)


Thanks for lookin!


Have a great day!


This post is proudly liked up to Freckled Laundry's


Air Your Laundry Linky party and


Wednesday, March 28, 2012

March {Make over} Madness!

Let me just start out this post by telling you that my "project pile" has never been so big.

In a perfect world, I could go junkin and everything I find would be in the perfect condition I would want and I wouldn't have to do A THING to it!

That is sooooooo not the case.

I even tell myself..."Okay self...stick to stuff that you can just put in the shop or a booth and the only thing you need to do to it , is put a price tag on it!"

That hardly ever happens.

It seems.

My creative side of my brains engulfs the entire rest of my brain telling it things like:

"oh...you could do this......

and then it would turn out like this......

or you could do this........!!!!"

Curses!

Ha...so obviously I am just going to have embrace the fact that I will forever have a

"project pile."

March came in with great mild weather and I starting diggin out the goods.

First up is this absolutely adorable vintage telephone stand..... "WHO are YOU wearing?"...she was asked at the Oscars......

"Why that would be Annie Sloan......in Duck Egg Blue!"

Lovely yes???


I really enjoyed working with Annie on this project.

Everything you hear is true.


one coat......


You can find this piece in my booth at the

Sleepy Poet!

Next up is this AWESOME old work bench on wheels.

Immediately I saw "KITCHEN ISLAND!!"


Just a basic coat of satin ivory paint and some distressing and antiquing.....


and BAM....updated to fit into any ones decor.


With a simple coat of poly on the top, it just made it shine.

This piece also rolled into my Sleepy POet booth.

Trust me ....I have more to show you BUT I best be getting to the shop!

Hope you all have a wonderful day!!


Tuesday, November 22, 2011

A Burlap thrift store MakeOver!

Hello friends!

It has been quite awhile since I shared with you a good ole fashioned

Thrift Store Make-Over Post!

Lord knows I've done a bunch of them but remembering to to take the all important BEFORE picture helps in the over all post ....know what I mean? Lots of times that doesn't happen.

Well ....THIS time I remembered!!

After making the car payment and buying a turkey yesterday I decided to head into the local Goodwill. I found this cutie laying in a heap of faded pointsettas.

The burlap caught my eye and so I picked it up and started to imagine what I could do with it.

The face was make from panty hose (ick..) and 1984 called and wanted their gold wings and thread back......
So I gladly gave it to them and transformed that

into THIS!

Christmas always brings out my primitive side and as soon as I started working on this

my primitive Santa took shape.

Gone is the panty hose head.....

Gone are the gold wings and thread....

Gone is the loopy twine hair......

Now we have a tea dyed old feed sack head.....
Vintage trim around the collar.....
Old curly wool for the beard....
Pine accents.....
A new hat and mittens.....


and a brand new twinkle in his eye!


I really enjoyed seeing this transformation! Usually it a piece of furniture so this was fun to do something different. Challenge yourself and head to the thrift store to find something like this and give it a holiday make-over. Could be a stocking, snowman, wreath, Santa or whatever! Use your imagination and create something that you will just love!

My Santa is for sale and is headed to the shop but you may want to use yours as a gift or just for yourself.

Either way....you are gonna have fun!
ho ho ho!!


Friday, March 4, 2011

Muslin Tote Bag Transformation

Good Friday Morning Friends!
I have been working on so many things for the shop recently~ getting ready for our Annual Spring Tyme at the Marketplace Open House March 19 & 20 ( yep...that was a plug !)
One thing I've been wanting to make are some tote bags to sell and to hand out as door prizes during the event.
This is what I came up with!
I am lovin the results.Simple~easy~adorable!
My fav part is the vintage chair webbing! I was lucky to find this in my dear friend Tammy's JunkWild Etsy shop! As soon as I saw it I knew I had to have it...for what I had noooooo idea at the time. So there it sat in my ultra organized, totally put together, craft/computer/spare/office (do I need to tell you to add sarcasm here again? huh? do I?) and I would look at it everyday. Finally the other day, the clouds parted and the EUREKA moment happed and I thought RUFFLE...which lead to tote bag...which lead to my printing program...whick lead to iron on transfer...which lead to this post!


I luuuuuvvvv the red stripe...


And here's the goods! The part that took me the longest was the design of the transfer. I have a Broderbund printing program that I haven't used often so it took me a little while to navigate the thing. As usual. I wish I was a tech~ie.


Here's the transfer. An important thing to note when using a transfer is that you have to print the image in reverse so it faces the right way when you apply it. My printing program offers this as an option. Aren't they sweet?


And there you have it! I have 6 of these for sale and 4 for give-aways! If you make it to the shop for the open house don't forget to get your ticket for a chance to win!
This post is linked up to some MAJOR Parties!
Air Your Laundry@ Freckled Laundry
Vintage Inspiration Friday@ Common Ground
Flaunt it Friday@ Chic on a Shoestring Budget
Frugal Friday@ Shabby Nest
Everything But the Kitchen Sink@ A Little Knick Knack
Have A GREAT FRIDAY!!